
![]()
How to Install a 50 amp RV Outlet (Diagrams in PDF)
DISCLAIMER: AS AN AMAZON ASSOCIATE I EARN FROM QUALIFYING PURCHASES. THIS POST CONTAINS AFFILIATE LINKS THAT WILL REWARD ME MONETARILY OR OTHERWISE WHEN YOU USE THEM TO MAKE QUALIFYING PURCHASES. FOR MORE INFORMATION, PLEASE READ MY EARNINGS DISCLAIMER. |
Wiring a 50-amp plug is not complicated because everything is pretty much straightforward and all you will need is a new 50 amp breaker, RV outlet (NEMA 14-50R), electrical conduit, and a wire (6/3 gauge is recommended with 8 gauge being a minimum). You can set up your 50-amp receptacle on a pedestal like in a campground, or put one on the side of your house or garage (whichever wall will be closer to where your RV is parked).
Coming home from a long trip only to get rolling again would require some restocking and that includes recharging your power systems. What could be a better way, than hooking up your RV directly into your house’s electrical system to charge your batteries and get ready for another road trip?!
50 amp receptacle gets connected to 4 wires in total with two of them being 120-volt hot wires, one neutral, and one ground. EACH hot wire will give you 50 amps @ 120 volts (or 6,000 watts):
120 volts x 50 amps = 6000 watts
And since two hot wires are there (each giving 6000 watts), it means that in total you will get 12,000 watts of power:
6000 w + 6000 w = 12,000 watt
Very often people place their plugs next to the main breaker box. Here is a good video to help you out with installation:

** Warning! If you are not 100% sure of what you are doing, DON’T DO IT! Call a licensed electrician for assistance.
** Alert! Tell your electrician that you will be using this outlet for your RV and the load may be unbalanced. Not all electricians are familiar with wiring specifically RV outlets and could wire your outlet for 240-volt service, so make sure your TEST the outlet before using it.
You need a breaker
You will need to install a double (or dual) pole 50 amp 120/240-volt breaker where 240-volt service will be split into 2 HOT feeds. In the dual-breaker, both breakers are bridged in order for them to trip simultaneously. Some breakers have an internal bridge.
** Don’t forget that working with electrical panels is DANGEROUS, so before you start working, make sure your main power supply is OFF!
The wires needed
Recommended wiring usage for your RV receptacle goes as follows:
- 25 feet or less: 8 gauge
- 25-50 feet: 6 gauge
- 50-100 feet: 4 gauge
Outlet types
If you are planning to plug your RV into a standard 15-amp or 20-amp outlet, you will get only this amount of power to use:
![]()
Most RVs use 30 amp or 50 amp plugs and if the proper amount of power is supplied, they can get the most out of their outlet. Some people think that if they will plug in their 30 amp system into a 50 amp outlet (via adapter), they will actually get more power.
This could be further from the truth. The only thing that you will get by plugging your 30 amp plug into a 50-amp outlet is the ability to charge your 30-amp system from it.
On the other hand, if you plug in a 50-amp system into a 30-amp receptacle, you will get ONLY 30 amp worth of power, which in the USA (with 120 volt systems) would give you 3,600 watts of power. If you do so, just make sure you use a good quality adapter that will reduce the power consumption of your RV in order not to trigger the breakers or overheat wires.
This video explains the difference between the 30 amp and 50 amp systems very well:
https://www.youtube.com/watch?v=GoOR2AJGjOI
![]()
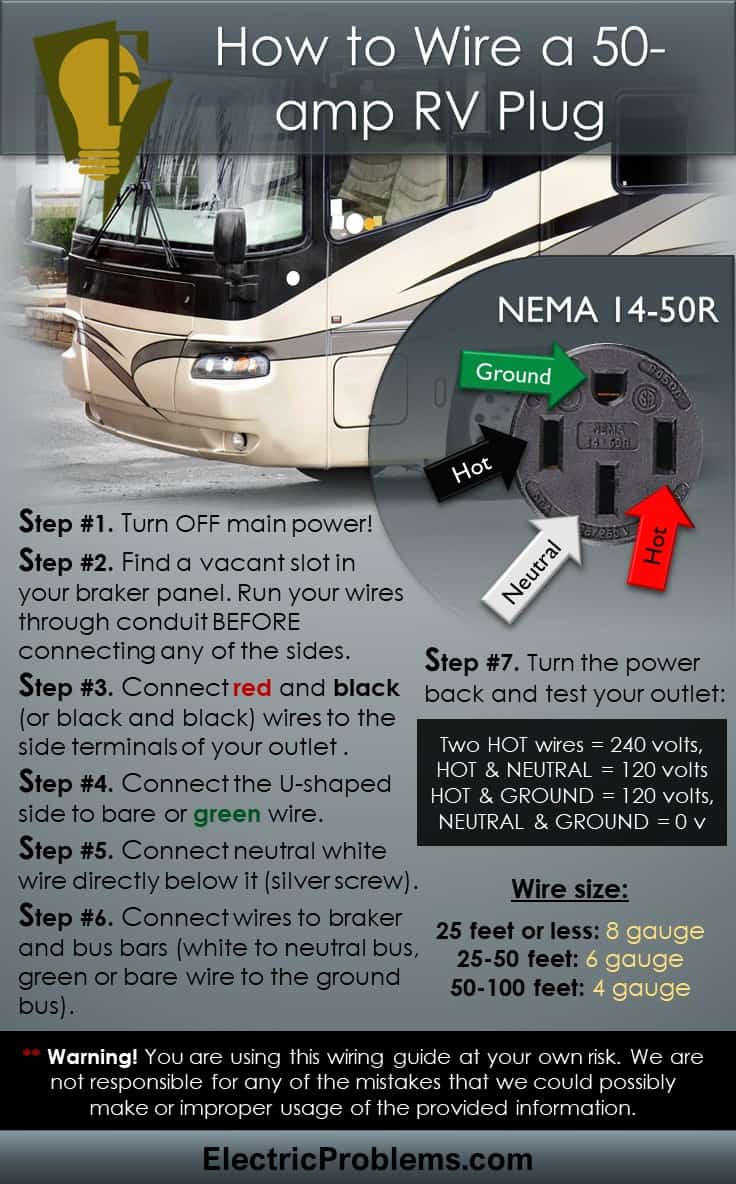
This is what a standard 50-amp RV receptacle (NEMA 14-50R) looks like:

This is what a standard 30-amp receptacle looks like:

** Warning! Do NOT confuse 14-50R outlet with OLD appliance 10-50R outlet, which is wired differently and will supply the whole 240 volts to your 120-volt appliance!
Very often RV plugs are confused with these 240-volt household outlets which are commonly used for dryers. This could be a costly mistake! Regardless of how big your RV is, it still requires 120-volts of power.
If you give your appliance a 240-volt current instead of a 120-volts one, it is just going to burn it out! Improper wiring or using the wrong type of outlet is usually the cause of delivering 240-volts to your RV instead of 120-volts and the consequences could be disastrous.
Wiring your 50-amp RV outlet
Wiring this type of outlet is not complicated. You will have four terminals or screws on the back of your receptacle (and sometimes they are color-coded):
Green terminal is for the ground wire
(2) Brass terminals are for HOT wires
Silver terminal is for the neutral wire
Typically HOT wires will be colored red and black, but sometimes they are BOTH black. You wire them to the brass terminals and it doesn’t matter which goes on which.
Ground wire (green or bare) goes on the green terminal or the one behind the U-shape. White (or neutral wire) goes directly below it, on the silver screw (or terminal).

Here is a wiring process:
- Step #1. Preparation. Get your wiring accessories out! One 50 amp outlet (or NEMA 14-50R), a wire (#6 or six-gauge is highly recommended), and a weather-resistant box. Also, take out your installation tools.
- Step #2. Safety First! Turn OFF your main power source.
- Step #3. Finding a place. If you don’t have vacant slots in your breaker panel, you may need to call an electrician to get an extension installed.
- Step #4. Running your wires. It is recommended to run your wires through the conduit BEFORE connecting any of the sides.
- Step #5. Connecting outlet. Connect red and black (or black and black) wires to the side terminals of your outlet (they could be color-coded as brass). Connect the U-shaped side to bare or green wire (terminal could be color-coded as green and white (or neutral wire) directly below it (silver screw).
- Step #6. Connecting the breaker. Two black (or red and black) wires go inside the breaker.
- Step #7. Connecting to bus-bars. Ground and neutral buses are terminal blocks (inside your breaker panel) with a lot of small holes in them. This is where you put appropriate wires and tighten them up with a screw. White wire needs to be connected to the neutral bus and bare (or green) wire to the ground bus.
- Step #8. Turn the power back ON. Even if you think you did everything right, just stick a surge protector on it or check it with a multimeter just to make sure.
Here is a diagram:
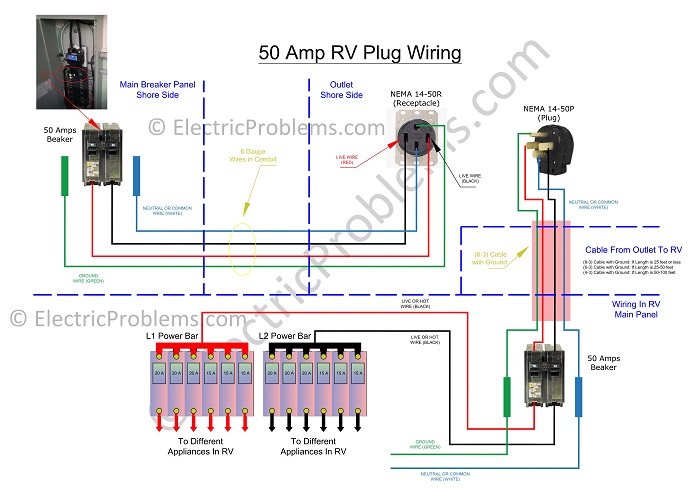
Feel free to download the PDF file for greater detail.
** Warning! You are using this wiring guide at your own risk. I am not responsible for any of the mistakes that I could possibly make or improper usage of the provided information.
Here is a pin that you can save for quick reference .
Testing your outlet
The best advice that I read on the internet about testing an RV plug, is NOT to trust ANYBODY (including a professional that installs it). Anyone can make a mistake and you may end up being the one paying for that mistake.
Also, because it is super easy to check the outlet, you cannot afford to be lazy now! You can use a multimeter (or voltmeter) to check for correct power coming through or simply plug in a surge protector, which will light up the green light if everything is OK.
If using a multimeter (or voltmeter):
- The voltage between HOT wires should be = 240 volts
- The voltage between HOT and NEUTRAL = 120 volts (check both)
- The voltage between HOT and GROUND = 120 volts
- The voltage between NEUTRAL and GROUND = 0 volts

Using your outlet
This type of outlet does give a lot of power! Unlike with 30-amp service, with 50-amps you can actually plug a lot of things in.
But there are still some pointers that are mentioned in all RV manuals, which you may ignore while just trying to quickly get on the road without reading it properly. This is how you connect your RV to shore power (whether at the RV part or your own house):
- Turn off ALL appliances. First of all, you should not attempt to plug in your cord under load.
- Turn shore power breaker or RV breaker OFF. This is important in order to avoid accidental electric shock or contact flashing.
- Plugin your cord. Align plug terminals with socket terminals and plug it in.
- Turn the breaker back ON. After contact is made and the plug is firmly seated inside the socket, you can safely turn RV breakers or shore power breakers ON.
Since this particular setup does supply a lot of power, maybe it’s not necessary to calculate amp usage for every single little device onboard, but if you like, this information is included in the article on 30-amp plug installation.
Missing some accessories?
Here are the receptacles for 50-amp service:
Weatherproof boxes:
And 50-amp double-pole breakers:

Click on the white button above to find your electrician!

Our Team

Legal Disclaimer


It’s very important to fully charge the car before every trip, but as I’m an RV beginner I don’t know how to wire a 50 amp rv plug. Your tutorial is easy to understand, hope it works for me.
Should the neutral and ground be bonded in the service panel?