
![]()
Solar Panel Installation on RV [w/ Wiring Diagrams]
Installing a solar system in the RV is more than just figuring out where to put solar panels, you will also need to wire an inverter (for your AC needs), a battery (for your DC needs and power storage) a charge controller (that prevents your batteries from overcharging), and some fuses. The whole solar panel installation first comes down to figuring out how much electricity you really need and what type of equipment and wiring will get you there.
The solar panel wiring is for some reason is considered a difficult task and that’s why we will discuss in detail below, along with different cases. Before we get started, you need to make sure that you decided on the exact size of inverter that you need to use, and here are some guidelines to help you out:
- Step 1: You must calculate the exact load and their respective power consumption (the power consumption of each device is written on its label, manual, or brochure).
- Step 2: You just add all the wattage and determine the total power consumption.
- Step 3: Choose the inverter with a higher rating than the total wattage needed at exactly the same time. For example, if your total power consumption is about 2300 Watts, then it’s a common practice to choose the inverter which has a higher power rating than 2300 Watts.
Inverters can also be differentiated by their output waveform. There are Pure Sine Wave inverters, Modified Sine Wave Inverters, and Square Wave Inverters. All these inverters are different in the quality of their output and cost.
A detailed discussion on the selection of inverters is provided in this article. Now, let’s look into the solar panel system.
Selection of Solar Panel
Based on construction solar panels, they are divided into three main types: monocrystalline, polycrystalline, and thin-film type solar panels.
1. Monocrystalline Type
As the name indicates, in this type of solar panel the photovoltaic cell is made of a single pure crystalline wafer. The main features of the monocrystalline panels include:
- Each cell of this panel is a single silicon crystal.
- They are more expensive than other types of solar panels.
- They have a hard structure that cannot be folded.
- They are highly efficient.
- These are dark black hue panels in color.
- Their life span is longer, in comparison to polycrystalline-type solar panels.
2. Polycrystalline Type
This type of solar panel is made from silicon as well, but in this case, multiple fragments are melted together to form a silicon wafer. The main features are:
- Each cell of this panel is made from fragmented photovoltaic cells.
- It is less expensive than other types of solar panels.
- It has a hard structure and cannot be folded.
- It is less efficient.
- These panels are bluish hue in color.
- They have less life span as compared to monocrystalline-type solar panels.
3. Thin-Film Type
Unlike monocrystalline and polycrystalline types, these panels are NOT in the form of solid structure, but rather made out of just a thin film. Based on the manufacturing material, thin-film solar panels are of different types.
The materials used in their manufacturing are Amorphous Silicon (a-Si), Cadmium Telluride (CdTe), and Copper Indium Gallium Selenide (CIGS).
The key features of this panel are:
- They are lighter in weight.
- Easily portable.
- Flexible and can be rolled.
- Have less performance and efficiency than monocrystalline or polycrystalline.
- Installation cost is less than monocrystalline or polycrystalline type solar panels.
- The cadmium Telluride (CdTe) type is the cheapest material used out of the three material types.
- Copper Indium Gallium Selenide (CIGS) type is the most expensive out of the three material types.
From the above key points, you can select a solar panel based on your affordability, performance need, and nature of use.
Solar Panel Wiring
Sometimes we need to connect smaller solar panel units to get a bigger solar panel bank for larger power output. To achieve this connecting the solar panels together is rather tricky.
The connection types are:
- Solar panel connections in series
- Parallel solar panel connections
By changing the connections from one type to other we can increase the output voltage or current. Now we are going to discuss how output current or voltage can be increased to get the necessary power out of your solar panel.
Solar Panel connection in series
In series combinations, we have different cases. We will discuss these cases one by one:
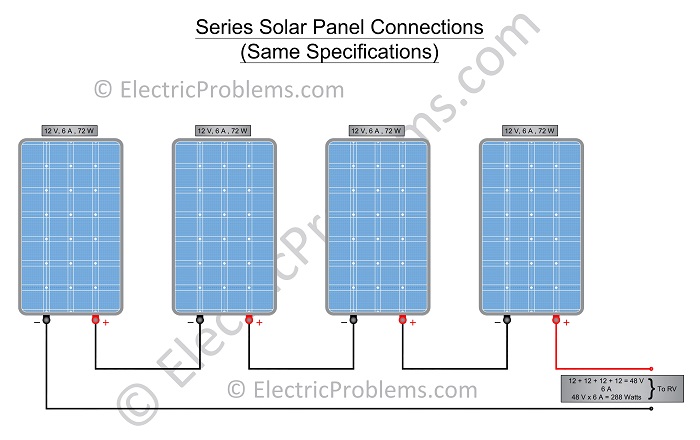
1. Series Solar Panel connections (same specifications)
When we connect the solar panels in series the output voltage is increased (added up together). To apply the series connection method, it is a better practice that all the solar panels should have equal power ratings (same voltage & current) and be the same type.
For wiring, the solar panels in-series connection goes as follows:
- The positive (red) terminal of the first panel is connected to the negative (black) terminal of the second panel
- The positive (red) terminal of the second panel is connected to the negative (black) terminal of the third panel and so on.
In the end, we have the positive (red) terminal of the last panel connected to the negative (black) terminal of the first panel (which is the output terminal of the series solar panel bank).
For example, we have four solar panels each has 72 Watts (12 V and 6 Amps) output:
- Panel #1: 12 V and 6 Amps, 72 Watts
- Panel #2: 12 V and 6 Amps, 72 Watts
- Panel #3: 12 V and 6 Amps, 72 Watts
- Panel #4: 12 V and 6 Amps, 72 Watts
By applying the above method, voltage is added up (12 + 12 + 12 + 12 = 48 V), while the current remains – 6 Amps. Now the combined output power is 288 Watts (48 V x 6 Amps = 288 Watts).
This is the maximum output of the panel when the sun fully shines.
 Download PDF
2. Series Solar Panel connections (different voltages, same current & different power)
These are solar panels of different specifications (like different voltage but the current of all solar panels is the same). For example, we have four solar panels each has a different voltage and the same current:
- Panel #1: 12 V and 6 Amps, 72 Watts
- Panel #2: 6 V and 6 Amps, 36 Watts
- Panel #3: 10 V and 6 Amps, 60 Watts
- Panel #4: 7 V and 6 Amps, 42 Watts
The wiring of all the series combinations will be the same as the first case but the output will be different due to different specifications. In this case, voltage is added up (12 + 6 + 10 + 7 = 35 V).
While the current remains at 6 Amps (which is the lowest current value of all solar panels connected in this case), the combined output power of this setup is 210 Watts (35 V x 6 Amps = 210 Watts). The solar panels will deliver this output when the sun fully shines on all solar panels.
 Download PDF
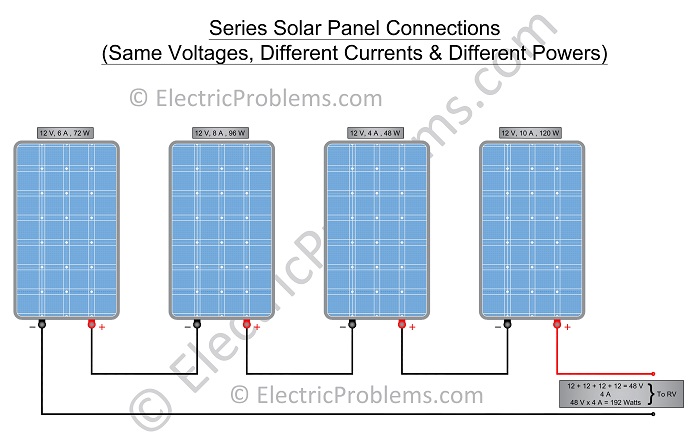
3. Series Solar Panel connections (same voltages, different current & different power)
Here we have solar panels of different specifications but in this case – different current and same voltage. For example, we have four solar panels:
- Panel #1: 12 V and 6 Amps, 72 Watts
- Panel #2: 12 V and 8 Amps, 96 Watts
- Panel #3: 12 V and 4 Amps, 48 Watts
- Panel #4: 12 V and 10 Amps, 120 Watts
Once again, the wiring will be the same as in the first case but the output will be different. In this case, voltage is added up (12 + 12 + 12 + 12 = 48 V), while the current is limited to the lowest current value (in this case, it is 4 amps).
Now the combined output power will be 192 Watts (48 V x 4 Amps = 192 Watts) and this output will be when the sun is shining at maximum.
 Download PDF
** This method has a major drawback. We have 4th solar panel that can give 10 amps, but in this case, it gives only 4 amps. This means we are using only 40% of its efficiency while wasting 60%. This is also the wastage of money.
The best solution to avoid power wastage and to get maximum efficiency, is to use solar panels of the same type & with the same specifications .
4. Series Solar Panel connections (different voltages, different current & different power)
Here is an example if we have solar panels which have different voltage and different current ratings, and we are going to connect them in-series fashion. These four solar panels could be:
- Panel #1: 12 V and 6 Amps, 72 Watts
- Panel #2: 6 V and 8 Amps, 48 Watts
- Panel #3: 10 V and 4 Amps, 40 Watts
- Panel #4: 7 V and 10 Amps, 70 Watts
Their wiring will be the same as in the above cases of series combinations. At the output side the voltage is added up as (12 + 6 + 10 + 7 = 35 V).
The output current is limited to the lowest current value of all the solar panels and in this case, it is 4 Amps. The output power rating is 140 Watts (35 V x 4 Amps = 140 Watts).
 Download PDF
** This method also has a drawback. Again, the 4th solar panel, which can give 10 Amps, in this case, gives you only 4 Amps. It means that we are using only 40% of its efficiency while wasting 60%. This is not cost-effective.
Solar Panel connection in parallel
When the solar panels are connected in parallel, then all the current of individual solar panels will be added up, while the voltage remains the same. Now, we will discuss different cases of parallel combinations:
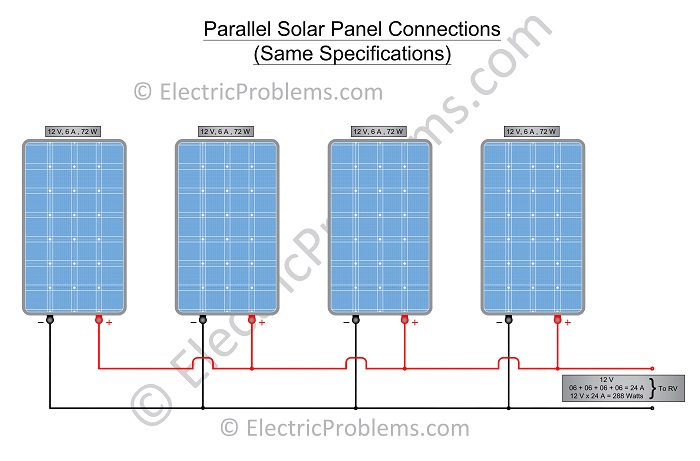
1. Parallel Solar Panel connections (same specifications)
The best practice in the parallel combination is that all the solar panels should be of the same type and same specifications. In a parallel setup:
- The positive (red) terminals of all the solar panels will be connected to the same point, and this point will serve as the positive terminal of the combined output.
- The negative (black) terminals of all the solar panels, will also be connected to the same point, and this will be the negative terminal of the combined output.
For example, we have 4 solar panels and each solar panel has the same specifications and is of the same type:
- Panel #1: 12 V and 6 Amps, 72 Watts
- Panel #2: 12 V and 6 Amps, 72 Watts
- Panel #3: 12 V and 6 Amps, 72 Watts
- Panel #4: 12 V and 6 Amps, 72 Watts
After wiring these four solar panels in-parallel method, the output will be calculated as follows:
The current of all solar panels will add up to 24 Amps (6 + 6 + 6 + 6 = 24 Amps) while the voltage will remain the same at 12 Volts.
The total output power is 288 Watts (12 V x 24 Amps = 288 Watts), which is a maximum output at full sunshine.
 Download PDF
2. Parallel Solar Panel connections (different voltages, same current & different power)
If we have solar panels with different specifications, then the basic rule will be the same as in a parallel setup – the currents are added up while the voltage remains the same. Let’s take an example of four solar panels that have different specifications, such as:
- Panel #1: 12 V and 6 Amps, 72 Watts
- Panel #2: 6 V and 6 Amps, 36 Watts
- Panel #3: 10 V and 6 Amps, 60 Watts
- Panel #4: 7 V and 6 Amps, 42 Watts
The basic wiring techniques of all the parallel combinations is the same and that is – all positive terminals should be connected to one point and all the negative terminal to the other point. These two points then behave as two output points.
After wiring, we will see that all currents are added up as (6 + 6 + 6 + 6 = 24 Amps) while the voltage will stick to the lowest value of all the solar panel voltages and that is 6 V. The output power will be 144 Watts (6 V x 24 Amps = 144 Watts) at full sunshine.
** The big disadvantage of this method is that 1st solar panel can give 12 Volts, but it only gives 6 volts. We are using 50% of its efficiency and wasting the rest 50%.
 Download PDF
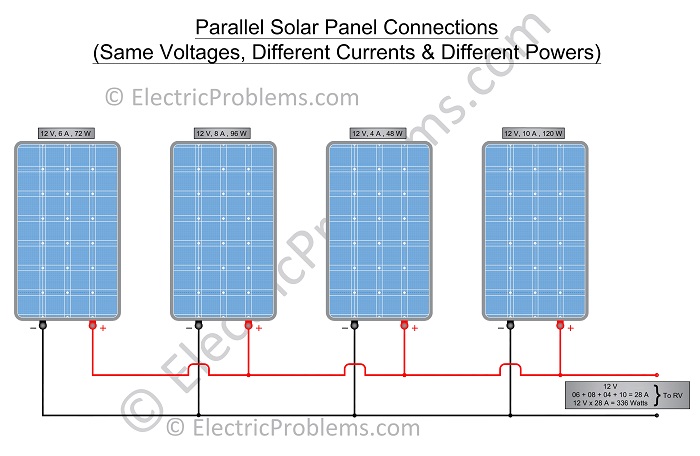
3. Parallel Solar Panel connections (same voltages, different current & different power)
If we have four solar panels and they have the same voltages, but different current, then all current values are added up and voltage remains the same value.
This is our example:
- Panel #1: 12 V and 6 Amps, 72 Watts
- Panel #2: 12 V and 8 Amps, 96 Watts
- Panel #3: 12 V and 4 Amps, 48 Watts
- Panel #4: 12 V and 10 Amps, 120 Watts
The wiring will be the same as in the above case. The output current will be the sum of all individual current values (6 + 8 + 4 + 10 = 28 Amps), while the voltage will be 12 Volts.
The output power at full sunshine in this situation will be 336 Watts (12 V x 28 Amps = 336 Watts).
 Download PDF
4. Parallel Solar Panel connections (different voltages, different current & different power)
As an example, let’s look at the following 4 solar panels:
- Panel #1: 12 V and 6 Amps, 72 Watts
- Panel #2: 6 V and 8 Amps, 48 Watts
- Panel #3: 10 V and 4 Amps, 40 Watts
- Panel #4: 7 V and 10 Amps, 70 Watts
The wiring connection of solar panels which have different voltage and different current ratings in parallel is the same as in the above parallel cases.
At the output side the output current is added up to 28 Amps (6 + 8 + 4 + 10 = 28 Amps). The output voltage will be the lowest voltage value of all the solar panels in this case it is 6 Volts and the power will be (6 V x 28 Amps = 168 Watts).
** This method also has a big disadvantage. The 1st solar panel can give 12 Volts, but it only gives 6 volts, which means we are using 50% of its efficiency and wasting the rest 50%.

Download PDF
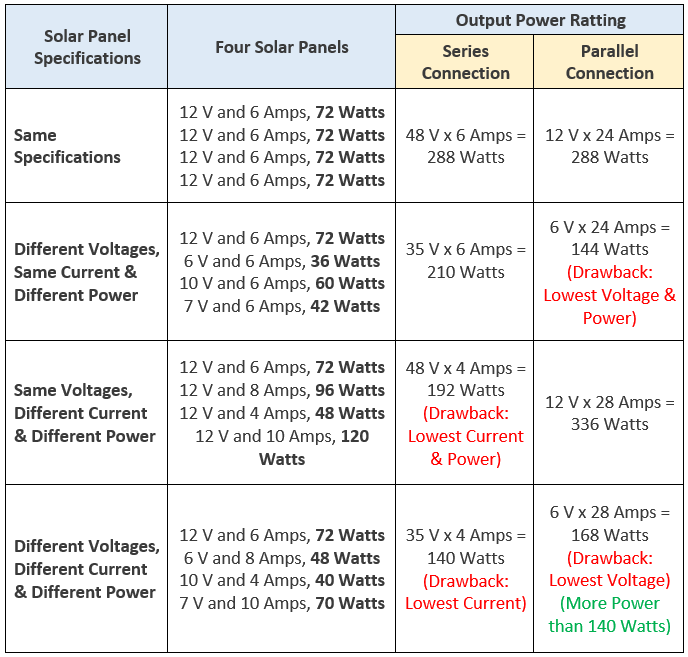
Now we can summarize all the data in tables to compare all the results quickly:
Compare series connections:
| Four Solar Panels | Series Connection |
| 12 V and 6 Amps, 72 Watts 12 V and 6 Amps, 72 Watts 12 V and 6 Amps, 72 Watts 12 V and 6 Amps, 72 Watts | Same Specifications 48 V x 06 Amps = 288 Watts |
| 12 V and 6 Amps, 72 Watts 6 V and 6 Amps, 36 Watts 10 V and 6 Amps, 60 Watts 7 V and 6 Amps, 42 Watts | Different Voltages, Same Current & Different Power 35 V x 6 Amps = 210 Watts |
| 12 V and 6 Amps, 72 Watts 12 V and 8 Amps, 96 Watts 12 V and 4 Amps, 48 Watts 12 V and 10 Amps, 120 Watts | Same Voltages, Different Current & Different Power 48 V x 4 Amps = 192 Watts (Drawback: Lowest Current & Power) |
| 12 V and 6 Amps, 72 Watts 6 V and 8 Amps, 48 Watts 10 V and 4 Amps, 40 Watts 7 V and 10 Amps, 70 Watts | Different Voltages, Different Current & Different Power 35 V x 4 Amps = 140 Watts (Drawback: Lowest Current) |
Compare parallel connections:
| Four Solar Panels | Parallel Connection |
| 12 V and 6 Amps, 72 Watts 12 V and 6 Amps, 72 Watts 12 V and 6 Amps, 72 Watts 12 V and 6 Amps, 72 Watts | Same Specifications 12 V x 24 Amps = 288 Watts |
| 12 V and 6 Amps, 72 Watts 6 V and 6 Amps, 36 Watts 10 V and 6 Amps, 60 Watts 7 V and 6 Amps, 42 Watts | Different Voltages, Same Current & Different Power 6 V x 24 Amps = 144 Watts (Drawback: Lowest Voltage & Power) |
| 12 V and 6 Amps, 72 Watts 12 V and 8 Amps, 96 Watts 12 V and 4 Amps, 48 Watts 12 V and 10 Amps, 120 Watts | Same Voltages, Different Current & Different Power 12 V x 28 Amps = 336 Watts |
| 12 V and 6 Amps, 72 Watts 06 V and 8 Amps, 48 Watts 10 V and 4 Amps, 40 Watts 7 V and 10 Amps, 70 Watts | Different Voltages, Different Current & Different Power 6 V x 28 Amps = 168 Watts (Drawback: Lowest Voltage) (Advantage: More Power than 140 Watts) |
Compare series to parallel connections:
Based on the above tables, we can conclude the following:
- The best approach to wiring solar panels in your RV is to use ones with the same specifications (same voltage and same current ratings).
- If we have solar panels with different specifications (such as different voltages & the same current), then it is better to use the “series connection” approach to connect them. This will give you a greater output power rating.
- If the solar panels have the same voltages & different currents, then it is better to use the “parallel connection” approach to get maximum power output.
- The worst case is if we have solar panels which have different voltages & different current ratings. If this is your case, then to get maximum output, you should use the “parallel connection” approach because it has more power output than “series connections”.
Combined Solar Panel connections
These types of connections are typically used when greater output is required like in the case of large solar panel power stations etc. This is a combined technique where larger solar panel banks are made.
These banks are further connected via series or parallel connection techniques.
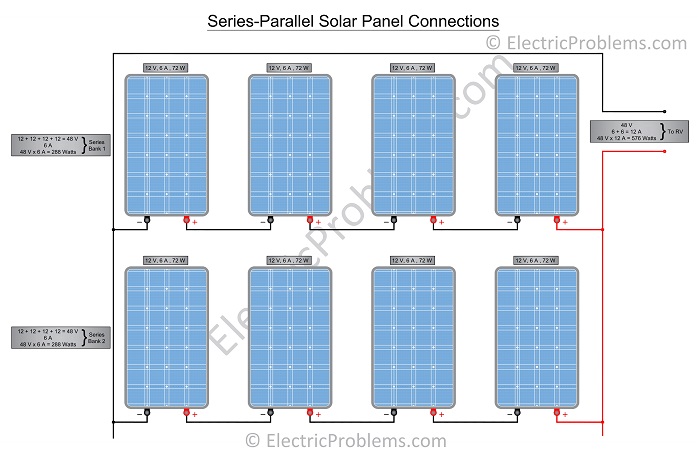
1. Series-Parallel solar panel connections
In Series-Parallel connections, first, we connect several solar panels in series to make a series solar panel bank. Since these solar panels are in series, the voltages are added up while the current remains the same.
We can make two or more series solar panel banks according to our need.
Then we connect all series solar panel banks in parallel. On the output side, the voltage remains the same as the individual series solar panel banks while currents add up.
For example, we have eight solar panels of each 12 V, 6 A, and 72 Watts. First, we connect solar panels 1 – 4 in series to make series solar panel bank #1.
The voltages add up to 48 V, while the current remains the same. The output is:
12 + 12 + 12 + 12 = 48 V, 6 Amps
48 V x 6 Amps = 288 Watts
In a similar fashion, we connect the series solar panel bank #2 (solar panels 5 – 8 in series), and the output will be:
12 + 12 + 12 + 12 = 48 V, 6 Amps
48 V x 6 Amps = 288 Watts
We can make as many series solar panel banks as we like. Now we connect all the series solar panel banks in parallel. On the output side, the current of all the series solar panel banks adds up, while the voltage remains the same as the individual series solar panel bank.
The output is:
6 + 6 = 12 Amps, 48 V
48 V x 12 Amps = 576 Watts
 Download PDF
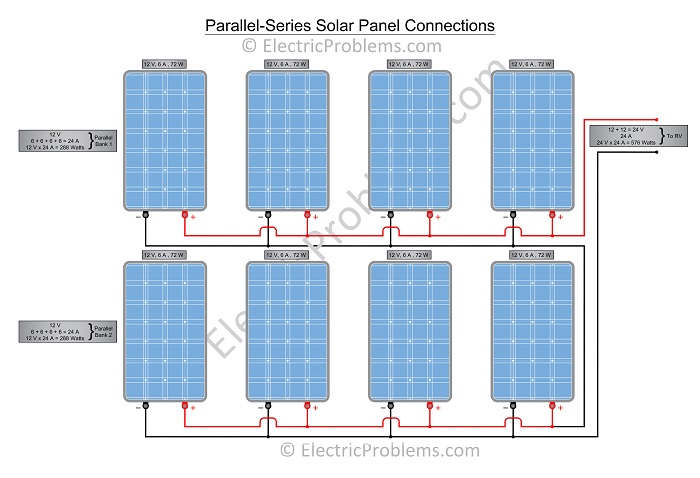
2. Parallel-Series solar panel connections
In parallel-series solar panel connections, we make parallel solar panel banks by connecting several solar panels in parallel. At the output side of this solar panel bank, the currents add up while the voltage remains the same.
Now, we make another solar panel bank in a similar fashion according to our need.
At last, we connect all parallel solar panel banks in series. At the output side, the voltage adds up because all parallel solar panel banks are now connected in series, while the current remains the same.
For example, we have eight solar panels of 12 V, 6 A, and 72 Watts. We connect the solar panel 1 – 4 in parallel to make parallel solar panel bank #1 and the output is:
6 + 6 + 6 + 6 = 24 Amps, 12 V
12 V x 24 Amps = 288 Watts
Now, for the parallel solar panel bank #2, we connect solar panels 5 – 8 in parallel. Similarly, on the output side, the currents add up while the voltage remains 12 V.
The output is:
6 + 6 + 6 + 6 = 24 Amps, 12 V
12 V x 24 Amps = 288 Watts
Finally, we connect the two parallel solar panel banks in series. At the output side, the voltage of both parallel solar panel banks adds up because now these are connected in series, while the current remains the same 24 A.
The output is:
12 + 12 = 24 V, 24Amps
24 V x 24 Amps = 576 Watts
We can connect several parallel solar panel banks in series to increase the output to the required value.
 Download PDF
Here is a comparison table of series-parallel connection and parallel-series connection (the same number of Solar panels is used for both types of connections):
| 2 Banks (4 Panels Each) | Each Solar Panel Bank | Total Output |
| 12 V, 6 A, 72 W 12 V, 6 A, 72 W 12 V, 6 A, 72 W 12 V, 6 A, 72 W X 2 (Banks) | 12 + 12 + 12+ 12 = 48 V 6 A 48 V x 6 A = 288 W 48 V, 6 A, 288 W | Series-Parallel Connection Output 48 V 6 + 6 = 12 A 48 V x 12 A = 576 W 48 V, 12 A, 576 W |
| 12 V, 6 A, 72 W 12 V, 6 A, 72 W 12 V, 6 A, 72 W 12 V, 6 A, 72 W X 2 (Banks) | 12 V 6 + 6 + 6 + 6 = 24 A 12 V x 24 A = 288 W 12 V, 24 A, 288 W | Parallel-Series Connection Output 12 + 12 = 24 V 24 A 24 V x 24 A = 576 W 24 V, 24 A, 576 W |
The type of solar panel wiring you choose basically comes down to your need and the available number of solar panels. Here is a nice video on how to complete your solar wiring (on a hot wire):

![]()
After connecting your solar panels, you will need to connect their output to the solar charge controller. The charge controller, in its turn, gets connected to the battery bank through a fuse box:
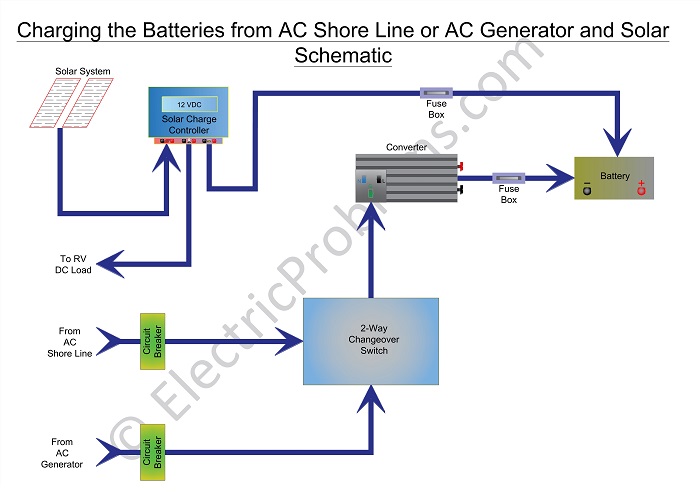 | 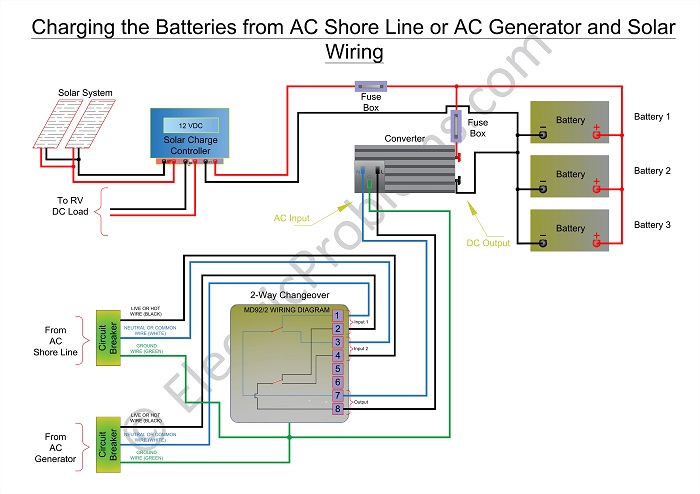 |
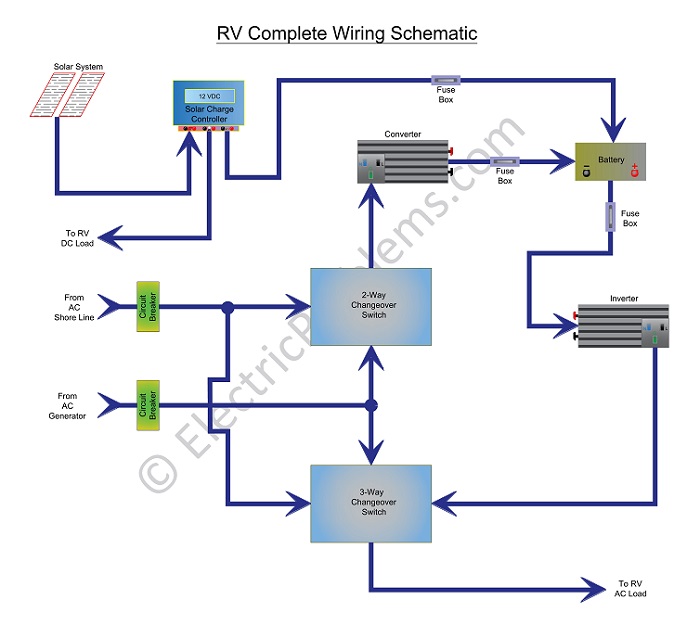
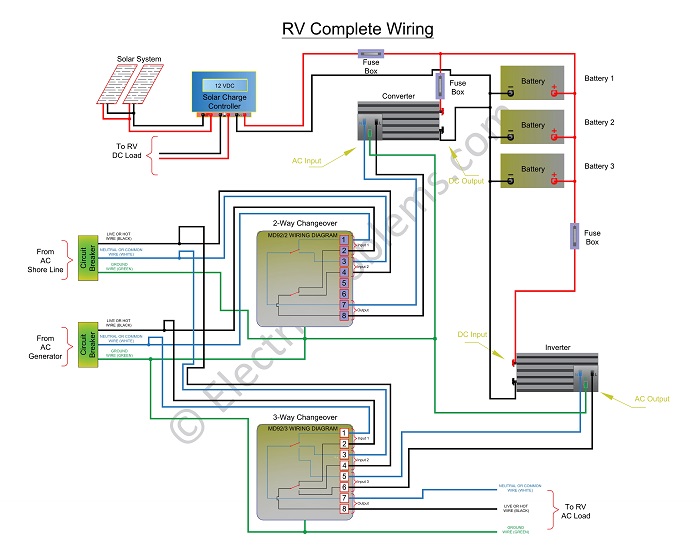
Here is what RV complete solar system can look like (this diagram includes shore power and a generator as well):
 |  |
Schematics & wiring in PDF.
You can also check out this article on wiring an inverter and setting up your RV battery bank.

Click on the white button above to find your electrician!

Our Team

Legal Disclaimer

