
![]()
How to Install 30 amp RV Outlet (w/ Diagrams in PDF)
DISCLAIMER: AS AN AMAZON ASSOCIATE I EARN FROM QUALIFYING PURCHASES. THIS POST CONTAINS AFFILIATE LINKS THAT WILL REWARD ME MONETARILY OR OTHERWISE WHEN YOU USE THEM TO MAKE QUALIFYING PURCHASES. FOR MORE INFORMATION, PLEASE READ MY EARNINGS DISCLAIMER. |
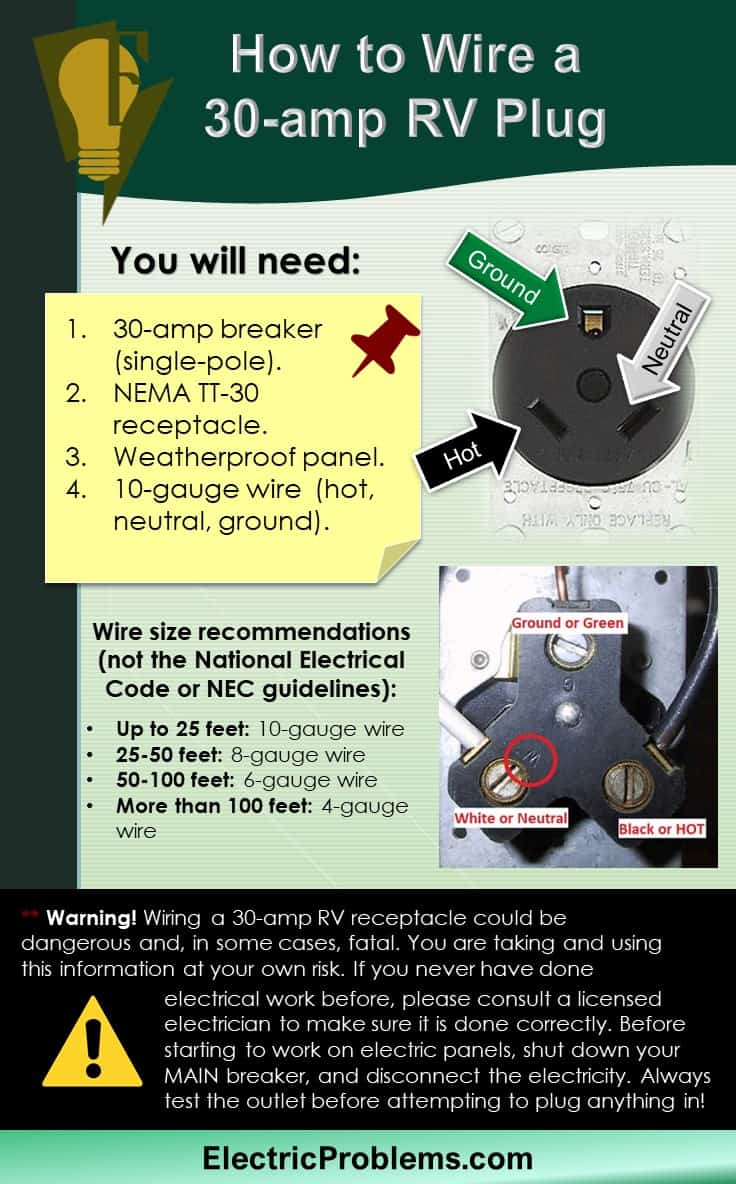
Wiring a 30 amp RV plug is not complicated and you should be ok as long as you test the outlet before attempting to plug anything in. All you will need is a 30 amp RV outlet (NEMA: TT-30R), #10 wire, a weatherproof electrical box, and a new breaker.
Installing an RV outlet at home is a great idea if you own a recreational vehicle or a camper. It could be used while stocking for trips, cleaning, and fixing it, as well as keeping your batteries charged!
You probably also have a few friends or family member-RViers, who would like to visit you as they pass by on their road trip. Get them connected and enjoy a nice BBQ together!
When RV is plugged in the 30-amp receptacle, it is considered to be a single appliance that draws a lot of power, so it must be limited by a 30-amp circuit breaker. This is very convenient, considering that you only have to plug in one cord in order to use your appliances!
Weather considerations
Since the recreation vehicle is usually the outside unit (parked outside), where all types of challenges are possible (anything from bad weather or being bumped into), the outlet needs to be located in the place where the least damage could be done.
A timber or a stud wall is the best for this purpose. The outlet should be mounted in a deep-lid weatherproof box and be at least 24 inches above the ground level:

Installation process
Before you start doing any electrical work on your outlet, make sure there is NO POWER coming through!
After turning off the breaker’s main switch, TEST IT with a multimeter or voltmeter to confirm that you have no electricity.
** Note. Multimeters are generally not expensive, but since you are dealing with electricity here, it is generally recommended that you get it from a reputable company (like Fluke and Klein Tools). Be careful, there are many multimeters out there with fake ratings, so just to be sure, you may want to get one that is UL-listed as well (paid link)
Now, installation. After reading through a lot of manuals, I decided that it’s better to see how it’s done, vs reading tons of text and trying to understand what in a world is written there!
I found a good video for you, but don’t forget that working with electricity is dangerous and only takes one electric arch to hurt you badly. This means if you are not sure about your skills, do get a professional installation.
This is how you install a 30-amp RV box in your backyard:

![]()
Types of outlets
The type of 30-amp receptacle we will be using is:
NEMA TT-30R
These types of outlets are usually marked “Travel Trailer Use Only” and will give you about 3,600 (120 volts x 30 amps = 3,600 watts) watts of power:
Voltage (Volts) x Current (Amperes) = Power (Watts)
The name of the matching 30-amp plug is:
NEMA TT-30P
We will be wiring an outlet that looks like this (a “U-shaped ground” 120-volt RV receptacle):

NOT like this (see below)! This is an “L-shaped neutral” 240-volt OLD dryer receptacle that could fry your RV appliances if you ever try to use it:

** Disclaimer. Wiring a 30 amp RV receptacle could be dangerous and in some cases fatal. You are taking and using this information at your own risk.
** Warning! If you never have done electrical work before, please consult a licensed electrician to make sure it is done correctly.
** Warning #2! Before starting to work on electric panels, shut down your MAIN breaker, and disconnect the electricity. This is very important because improper handling of electric devices can cause serious injury and even death.
What size wire for 30 amp RV service
If you are looking to hook up your trailer to a 30-amp, 120V service in your home, then you will need to use at least a 10-gauge wire (or an 8-gauge wire just to be on the safe side). Smaller wires create more resistance when being used and in the end, it’s all worth it if you end up with less power consumption.
If you are thinking of using a 10-gauge wire with a distance shorter than 100 feet, it’s doable, just make sure that loads on your 30-amp RV electrical system will be less than 20-amps. My suggestion will be to avoid using multiple appliances (like A/C, microwave, coffee maker, hairdryer) at the same exact time and you will be in a good shape!
It is important to always use a wire size that has sufficient current-carrying capacity to handle the load. An undersized wire can overheat and potentially start a fire!
Voltage drop
Voltage drop is calculated using the wire’s resistance, distance, amperage, and circular mills. The longer the wire, the higher the voltage drop. If you need to run your wire for more than 75-100 feet, use a heavier gauge wire.
For wiring a 30-amp circuit it is recommended to use:
- up to 25 feet: 10-gauge wire
- 25-50 feet: 8-gauge wire
- 50-100 feet: 6-gauge wire
- more than 100 feet: 4-gauge wire
** Very important! These numbers are just recommendations and not the National Electrical Code (or NEC) guidelines.
When pulling a lot of amperage over long distances, this will reduce the voltage drop. Low voltage is a major concern for RVers, especially if they use A/C at times.
Air conditioners have about 50-60 amp initial startup current and you may have trouble starting it if the wire is too small and/or the voltage drops too low (below 105). The undervoltage situation can really damage your A/C and other appliances.
Temperature adjustment
Adjustment is also required for different temperature situations where your wiring will be located. A higher temperature may require a greater correction because temperature affects the magnitude of the current-carrying capacity of the wire.
A lower temperature may require a less severe correction.
Wiring your 30-Amp RV Outlet
Your receptacle will require a single 30 amp breaker. There will be three wires coming from the breaker panel that will be connected to your circuit breaker:
- Black wire – HOT
- White wire – NEUTRAL
- Green or bare wire – GROUND
Terminals on the back of the outlet are also color-coded (marked with a color name or a letter):
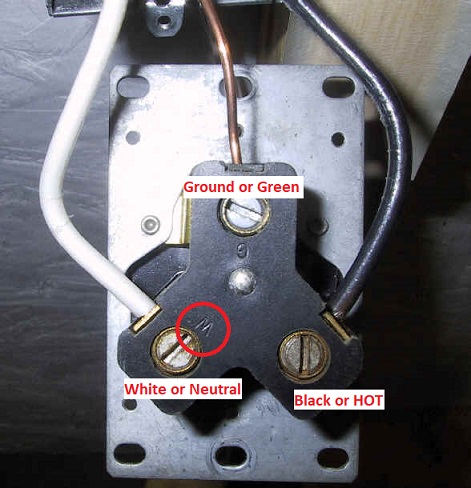
If not, they go as follows (or see image above):
- Green screw – Green or Bare wire (ground)
- Silver screw – White wire (neutral)
- Brass screw – Black wire (HOT)
Here is the step-by-step wiring process.
- Step #1. Preparation. You will need a 30-amp outlet receptacle NEMA TT-30R, 10 gauge wires, a weather resistance box, and the wiring tools.
- Step #2. Safety precaution! Turn OFF the power supply at the MAIN breaker! It is also a good idea to leave a note for other people so they don’t turn it back ON.
- Step #3. Slot for breaker. There must be a vacant place in the panel box. If not, then you can add an extension panel for a 30-amp RV breaker. If you are not experienced enough for this type of work, then it’s better to call an electrician to do this job correctly.
- Step #4. Running wires. First, run the wires through the conduit, then connect the wires to either side.
- Step #5. Outlet-side connection. Connect the black (or hot) wire to the black terminal of the outlet, then the white (or neutral) wire to the white or neutral terminal of the outlet. At last, the green or bare wire to the green or ground terminal of the outlet.
- Step #6. Breaker-side connection. The black (or hot) wire will go to the breaker.
- Step #7. Bus-Bars connection. In the breaker panel, the green (or ground) wire is connected to the green bus-bar (or terminal block) and the white wire is connected to the neutral bus-bar.
- Step #8. Turn the main breaker ON. As a safety precaution, you should double-check your outlet with the multimeter BEFORE starting to use it!
Here is a diagram:

Here is a PDF version of the diagram.
You can save this infographic pin for future reference .
Testing your 30-amp outlet
Also, before plugging in your devices for the first time, it’s a good idea to check the outlet first. For RVs, there is a very popular surge protector is from Camco (paid link) and it is sold on Amazon.
Once plugged in, it can check your “polarity” and will let you know if the wires are connected properly. It also serves as a surge protector, so you may want to keep it on all the time.
Of course, you can check your outlet with a good-ol’-fashioned multimeter as well! There is a reason why they say:
Better be safe, than sorry

Here is an article (RV Surge protector pros and cons) that will show you how to keep your valuable property safe and protected.
Using your 30 amp receptacle
Whether you are at the campsite or your backyard, before plugging in your RV, ALWAYS check that it will provide 110-125 volt single-phase AC power! Check it with voltmeter or multimeter and if numbers are off, DO NOT USE IT!
Use your power SAFELY!
First of all, another warning! Sorry, but I don’t want you to damage your appliances!
Do NOT plug in or unplug your cord while being under load!
This means that all your 120-volt appliances should be turned OFF before connecting them to shore power. The same goes for disconnecting.
This may be a hassle, but is surely worth it! Here is a step by step process for connecting your RV:
-
- Step 1 – turn off main breakers or breakers inside your RV.
- Step 2 – plug in your cord.
- Step 3 – turn the breaker ON.
Here is the process for disconnecting your RV:
-
- Step 1 – turn off main breakers or breakers inside your RV.
- Step 2 – disconnect your cord.
- Step 3 – coil it and put it away.
Calculate your AMPs properly!
30-amp service is very popular, but not designed to run many appliances all at once. To figure out how much your device will be drawing (and if amps are not mentioned), all you have to do is divide the watts of your appliance by volts that you will be using (110-120 in the USA):
Power (Watts) = Voltage (Volts) x Current (Amperes)
So:
Power (Watts) / Voltage (Volts) = Current (Amperes)
If you are not sure how many amps your device will be drawing (at 120 volts AC), here is a nice chart for you (the number is rounded to three decimals):
| Power | Current |
| 50 watts | 0.417 amps |
| 100 watts | 0.833 amps |
| 150 watts | 1.25 amps |
| 200 watts | 1.667 amps |
| 250 watts | 2.083 amps |
| 300 watts | 2.5 amps |
| 350 watts | 2.917 amps |
| 400 watts | 3.333 amps |
| 450 watts | 3.75 amps |
| 500 watts | 4.167 amps |
| 600 watts | 5 amps |
| 700 watts | 5.833 amps |
| 800 watts | 6.667 amps |
| 900 watts | 7.5 amps |
| 1000 watts | 8.333 amps |
| 1100 watts | 9.167 amps |
| 1200 watts | 10 amps |
| 1300 watts | 10.833 amps |
| 1400 watts | 11.667 amps |
| 1500 watts | 12.5 amps |
| 1600 watts | 13.333 amps |
| 1700 watts | 14.167 amps |
| 1800 watts | 15 amps |
| 1900 watts | 15.833 amps |
| 2000 watts | 16.667 amps |
| 2100 watts | 17.5 amps |
| 2200 watts | 18.333 amps |
| 2300 watts | 19.167 amps |
| 2400 watts | 20 amps |
| 2500 watts | 20.833 amps |
If your appliances take more than 30 amps combined, the circuit breaker will be tripped. Here is approximate amp usage per device (your CONVERTER will be listed separately since it runs continuously and its usage depends on DC load, like battery charging, lights, etc.):
| Load | Usage |
| Converter | 5-13 amps |
Appliances on RV commonly use this amount of power (you can convert wattage to get the exact number of amps):
| 120 VOLT system | ||
| Units | Load | Usage |
| 1 | Roof air conditioner | 10-15 amps |
| 1 | Washer/dryer | 13-15 amps |
| 1 | Residential refrigerator | 12-15 amps |
| 1 | Electric kettle | 12-13 amps |
| 1 | Electric frying pan | 10-11 amps |
| 1 | Electric water heater | 10-12 amps |
| 1 | Toaster (2 slices) | 7-13 amps |
| 1 | Microwave | 8-11 amps |
| 1 | Battery Charger | 8-9 amps |
| 1 | Hair Dryer | 8-9 amps |
| 1 | Space heater | 10-15 amps |
| 1 | Electric coffee maker | 7-12 amps |
| 1 | Iron | 7-8 amps |
| 1 | Food Processor | 6-7 amps |
| 1 | Window air conditioner | 6-7 amps |
| 1 | Electric Stove | 5-6 amps |
| 1 | Electric Drill | 4-5 amps |
| 1 | Ceiling fan | 3-5 amps |
| 1 | TV | 3-4 amps |
| 1 | Curling iron | 3-4 amps |
| 1 | Hand Vacuum | 2-3 amps |
| 1 | Computer | 2-3 amps |
| 1 | Heating Pad | 1.5-2 amps |
| 1 | DVD player | 1-2 amp |
| 1 | Radio | 1-2 amp |
| 1 | Satellite (dish & receiver) | 1-2 amps |
| 1 | Light | 1-2 amps |
** These guides are for informative purposes only and a professional should be consulted for more details.
The point is that if you are planning everything in advance, your RV experience (whether home or on the road) will be pleasurable and comfortable. Connecting your RV to your own 30 amp receptacle is a worthwhile project everything should work out, as long as you TEST it before plugging anything in.
Ready to start wiring?
Here are some good 30-amp receptacles that I found on Amazon:
And weatherproof boxes (receptacle panels):
Of course, some single-pole 30-amp breakers:
As always, being safe, staying healthy, and collecting wisdom along the way is usually the best way to go!

Click on the white button above to find your electrician!

Our Team

Legal Disclaimer

