
![]()
How to Wire an RV Plug (Installing Outlet at Home)
DISCLAIMER: AS AN AMAZON ASSOCIATE I EARN FROM QUALIFYING PURCHASES. THIS POST CONTAINS AFFILIATE LINKS THAT WILL REWARD ME MONETARILY OR OTHERWISE WHEN YOU USE THEM TO MAKE QUALIFYING PURCHASES. FOR MORE INFORMATION, PLEASE READ MY EARNINGS DISCLAIMER. |
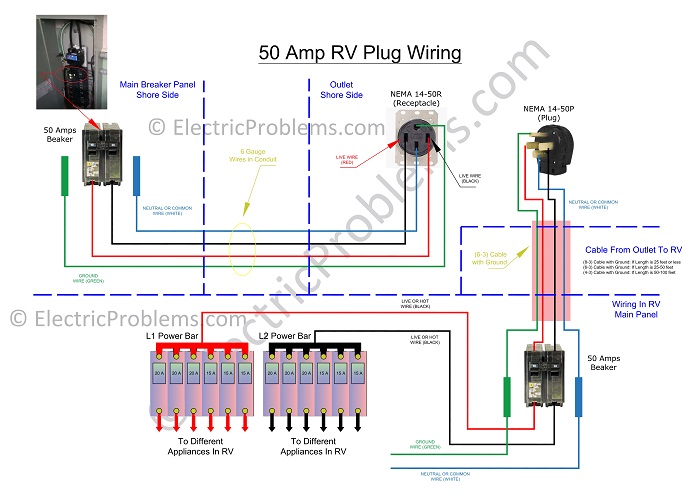
Wiring an RV outlet at home is not super complicated since all wires and connections are color-coded. Green (or bare) wire goes to the green screw, white wire to the silver screw, black (or red in 50 amp plug) goes to the brass screw.
If you have a recreational vehicle, it is always nice to have an RV outlet in your home to plug into. This way you can easily prepare for your next road trip or use your RV as a guest house when friends or family come to visit you.
Keeping your RV or trailer plugged in will keep your batteries charged and healthy, as well as let you work on your RV or do upgrades a lot easier. But before we get started, let’s clarify what kind of RV electrical service you have.
Generally, your motor home or a camper trailer is wired for one of the two services:
- 30-amp (for smaller motorhomes and trailers with 1 roof air conditioner).
- 50-amp (for larger RV with 2 roof air conditioners and full-size appliances).
https://www.youtube.com/watch?v=PYECEQMmG8s
![]()
RV plug types
30-amp service
Now, let’s take a look at the plugs that your RV is provided with. Following is a 30-amp service plug:
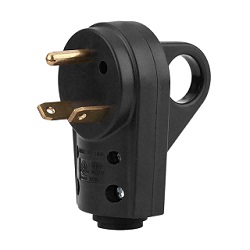
It’s a three-prong 120-volt male cable that will provide you with:
120 volts x 30 amps = 3,600 watts
50-amp service
Here is what a 50-amp service plug looks like:

This four-prong 120/240-volt plug will give you 2 connections of 50 amps @ 120 volts (or 6,000 watts) each. It’s a dual 50 amp system and that means that you will be getting a whole 12,000 watts (6,000 + 6,000) worth of power to use!
6,000 w + 6,000 w = 12,000 watts
This is NOT a 240-volt service, but a split 120-volt service. Anytime you see this type of warning sign, you know that you have a 50 amp service:

How to wire RV plug
For wiring either one of the electrical services (either 30 or 50 amps) you will need the following:
- An outlet
- Electrical box
- A breaker
- Wires
- Faceplate
- Conduit
- Wiring tools
1. An outlet
Use NEMA TT-30R for 30 amp service and NEMA 14-50R for 50 amp service. This is what these receptacles look like:
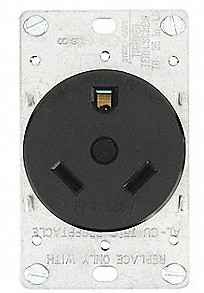 NEMA TT-30R | 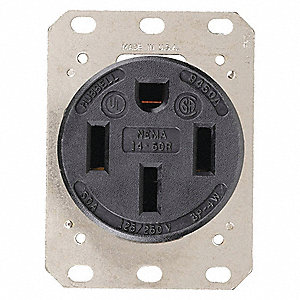 NEMA 14-50R |
2. Electrical box
You will also need a weatherproof outdoor receptacle panel that generally looks like this (for outdoor usage, your outlet requires to have the ability to be covered while the cord is plugged in):
 RV 30-amp outlet box | 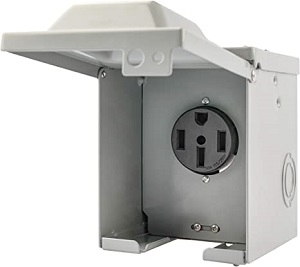 RV 50-amp outlet box |
3. A breaker
You will need a single-pole 120v breaker for 30 amp service and a double pole 120/240-volt breaker for 50 amp service (basically this is two 50 amp breakers, see below):
 Single-pole 30 amp breaker | 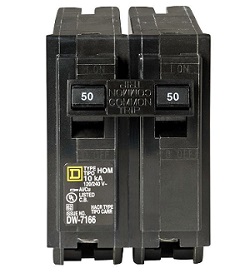 Double-pole 50 amp breaker |
** Important note! Check the label inside your breaker panel for mentioning which brand and style of breaker you will need to use.
4. Wires
Use a minimum of 10 gauge wire for 30 amp service and a minimum of 8 gauge wire for 50 amp service (6 gauge is recommended). All wires need to have a ground in them.
Cable selection for 30-amp service RV outlet:
- (10-2) Cable with Ground: if the length is 25 feet or less
- (8-2) Cable with Ground: if the length is 25-50 feet
- (6-2) Cable with Ground: if the length is 50-100 feet
- (4-2) Cable with Ground: if the length is more than 100 feet
Cable selection for 50-amp service RV outlet:
- (8-3) Cable with Ground: if the length is 25 feet or less
- (6-3) Cable with Ground: if the length is 25-50 feet
- (4-3) Cable with Ground: if the length is 50-100 feet
Don’t forget that the longer the wire, the more performance loss you could experience! In the example above, (8-3) means an 8-gauge cable with 4 wires (the fourth wire is ground).
** Important note! These numbers are NOT the National Electrical Code (or NEC) guidelines.
5. Other
You will also need:
- Face (or Cover) Plate
- Conduit
- Wire Staples
- Cable Clamps
- Wiring tools
Wiring procedure
After finding a good place for an outlet and running all the wires, this is how you connect them:
- Step #1. Turn the main power OFF!
Your main breaker should be located right inside the breaker panel and is usually labeled for 100 amps or more. If you don’t see it, look for another breaker panel which is the main power source for other breaker panels.
Don’t stop until you find the actual MAIN breaker panel and turn all your power OFF! It is also suggested that you put the tape on this breaker (and maybe a note) just in case some people will not be aware that you are working on something and will want to turn the power ON.
** Warning! Working with electricity is EXTREMELY dangerous, because even if you turn everything OFF, there may still be some electricity floating around. Be careful and watch for close contacts with the main breaker switch.
After opening the panel cover, you can test the breakers with any voltage reading device and confirm that there is NO power at any of the breakers except for the main. You can use a regular voltmeter for that purpose or a “NON-contact” version of it.
** Very important! Do NOT attempt wiring anything if you are not sure about what you are doing!
Breaker-side installation
- Step #2. Locate an empty space in your breaker panel and install a brand-new breaker.
Here is the installation procedure for 30 amp service:

![]()
And this is how you install a 50-amp receptacle:

![]()
Now I will continue with the installation steps:
- Step #3. Bring new wire inside the circuit breaker panel.
- Step #4. Trim the cords jacket cover about an inch to expose wires while making sure you are not damaging individual wire insulation.
- Step #5. Remove insulation cover from each wire. About 0.5 inches is sufficient because you don’t want to expose a lot of bare wire.
- Step #6. Locate the ground bus (a terminal block with a lot of small holes where all the ground wires are going to) and attach a ground (or bare) wire. Make it tight.
- Step #7. Locate the neutral bus, loosen a screw and attach white wire to it. Tighten the screw.
- Step #8. Attach 1 black HOT wire (for 30-amp service) or 2 black HOT wires (sometimes black and red) for 50-amp service.
For 50 amp service, it does not matter which color (black or red) HOT wire is attached to which breaker terminal. Terminal screws should not come in contact with wire insulation.
- Step #9. The last thing to do in breaker side installation is to tug on the wire and see if you can pull it. You should not be able to do so.
** Be careful and always watch where your hands and metal tools are!
- Step #10. Put back your breaker panel cover and label your breaker.
Outlet-side installation
- Step #11. Unscrew the fasteners of your outlet.
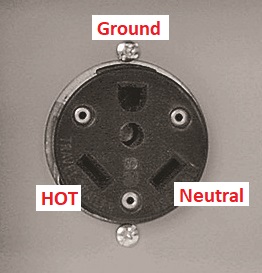
- Step #12. Match color-coded wires to appropriate screw terminals.
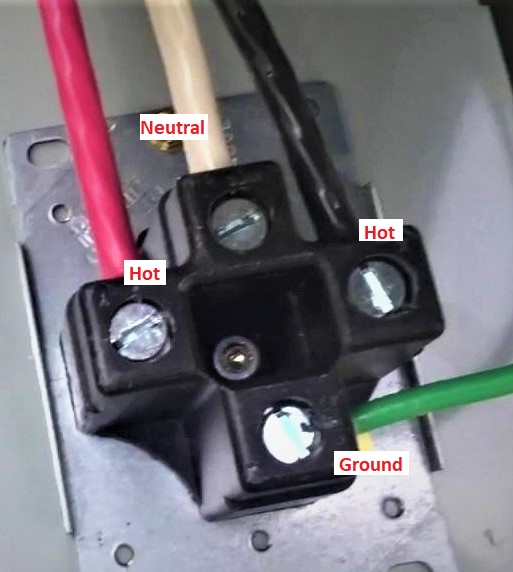
This is for 30-amp service:
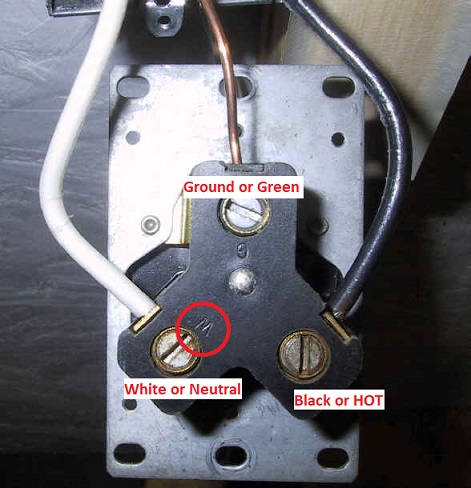
Backside:
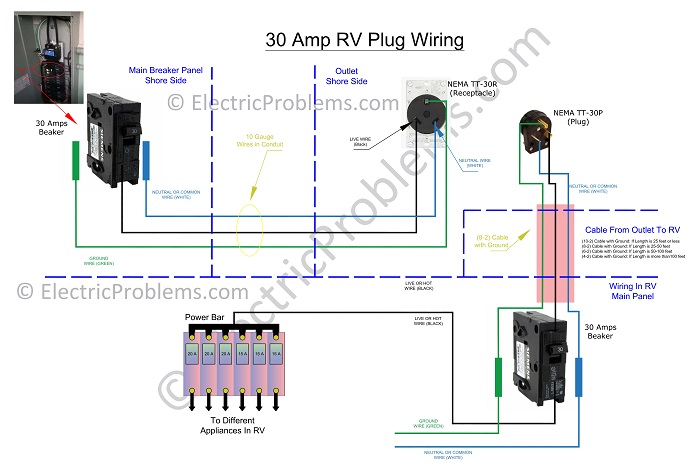
A wiring diagram (also available in PDF version):
 This is for 50-amp service:

Backside:
Wiring diagram (you can download it in PDF as well):
For more details on the installation procedure, you can check out other articles:
** Warning! You are following these wiring instructions at your own risk. I am not responsible for any mistakes or improper handling of information. Do not attempt any of this if you are not professional!
Here are more detailed instructions (in an infographic format) that you can save for reference .
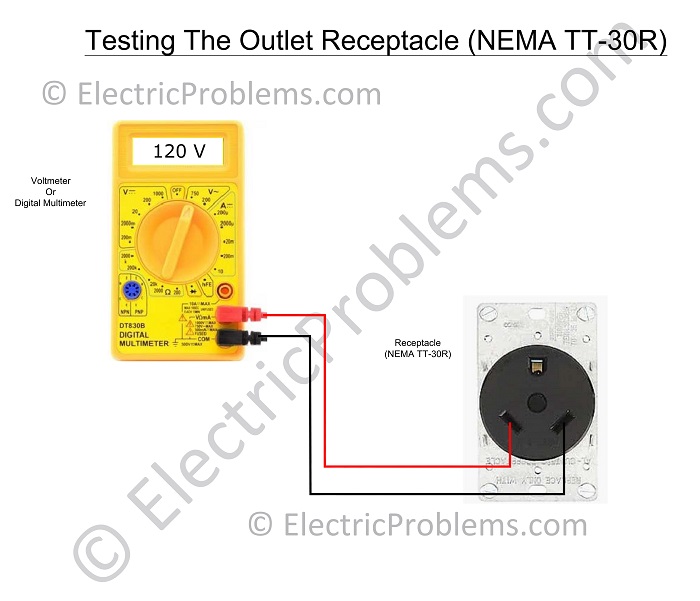
Testing your service
It is recommended to test your service with a voltmeter or a surge protector BEFORE attempting to plug anything in. This also applies if you’ve got professional installation or using an outlet for the first time in any RV park.
30 amp service
Your outlet readings should be as follows:
- Around 120 volts between HOT and GROUND wires.
- Around 120 volts between HOT and NEUTRAL wires.
- 0-2 volts between NEUTRAL and GROUND wires.
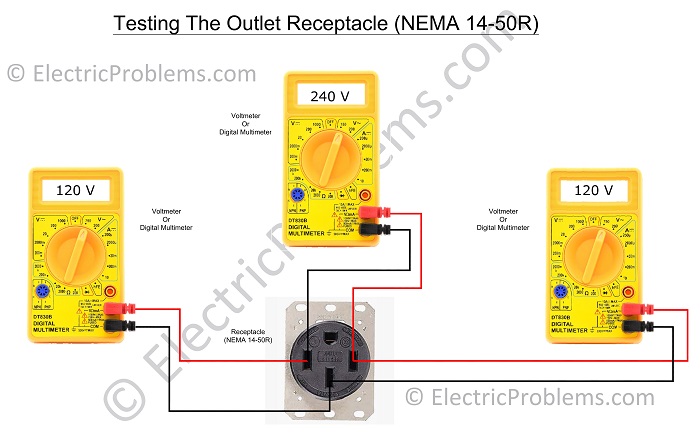
50 amp service
As you test your outlet with a voltmeter, you should be getting:
- Around 240 volts between HOT wires.
- Around 120 volts between HOT and NEUTRAL wires.
- Around 120 volts between HOT and GROUND wires.
- 0-2 volts between NEUTRAL and GROUND wires.
Using your service
Before plugging in your RV power cord, most manufacturers suggest the following:
- Turn OFF all connected appliances in your RV.
- Turn OFF the service breaker and if not available, turn OFF the breaker inside your RV.
- Plug your cord IN.
- Turn the breakers back ON (either main or RV).
** Important! The following statement goes for both 30 amp and 50 amp services:
You should NEVER plug in your cord under load!
30-amp service
With a 30-amp service, you have to be very selective about what types of appliances you will be using at the same time. Don’t forget, you will ALWAYS have a converter running and that takes some energy as well.
This service is NOT very powerful, so choose your devices with care. Since the breaker is designed to start triggering at 80% of full load capacity, you may want to consider this when you are doing your calculations.
Here are some examples of the approximate amount of appliances you could be using at the same time (as long as they end up being 30 amp – 20% = 24 amps, you should be OK):
- Converter + DC services (lights, etc) @ 5 amps (if it’s not running anything and just charging a battery)
- Roof air conditioner @ 10 amps
- Refrigerator @ 8 amps
5 amps + 10 amps + 8 amps = 23 amps
If at some point you will need to use your microwave @ 8 amps (for example), some devices will need to be turned OFF to release the load. With 30 amp services, a rule of thumb is to make sure something will be unplugged before you turn on another power-hungry device!
** Important! It’s a good idea to calculate your amp usage before turning ON another device that you want to use, otherwise, you may end up tripping breakers.
** A side note. If you are not sure what your equipment’s amps are, use the following formula to convert watts into amps:
watts / volts = amps
For example, a 400-watt device @ 120-volt current will demand 3.333 amps:
400 watt / 120 volts = 3.333 amps
A full conversion table is available in this article: “How to Wire a 30 amp RV Plug“. Feel free to check it out.
50-amp service
There is A LOT of power in this service! Just in case you feel like you are getting to the limit of your amp usage, feel free to check out the above article for amp calculations as well.
Outlets and weatherproof boxes
Here are my top picks for 30-amp receptacles (from Amazon):
And 50-amp receptacles:
Happy camping and safe wiring!

Click on the white button above to find your electrician!

Our Team


Legal Disclaimer

